
Skill Level 1
Time to complete:
Experienced: 1 hr
Handy
1,5 hrs.
Novice
2 hrs
Materials: TSP solution, wood putty, paintable caulk, primer, paint, sandpaper, blue painter’s masking tape
Tools: Paint scraper, sash knife, tack cloth, putty knife or pry bar (for removing trim), 2 inch sash brush, utility knife, window scraper or single-edge razor blades, bucket, sponge
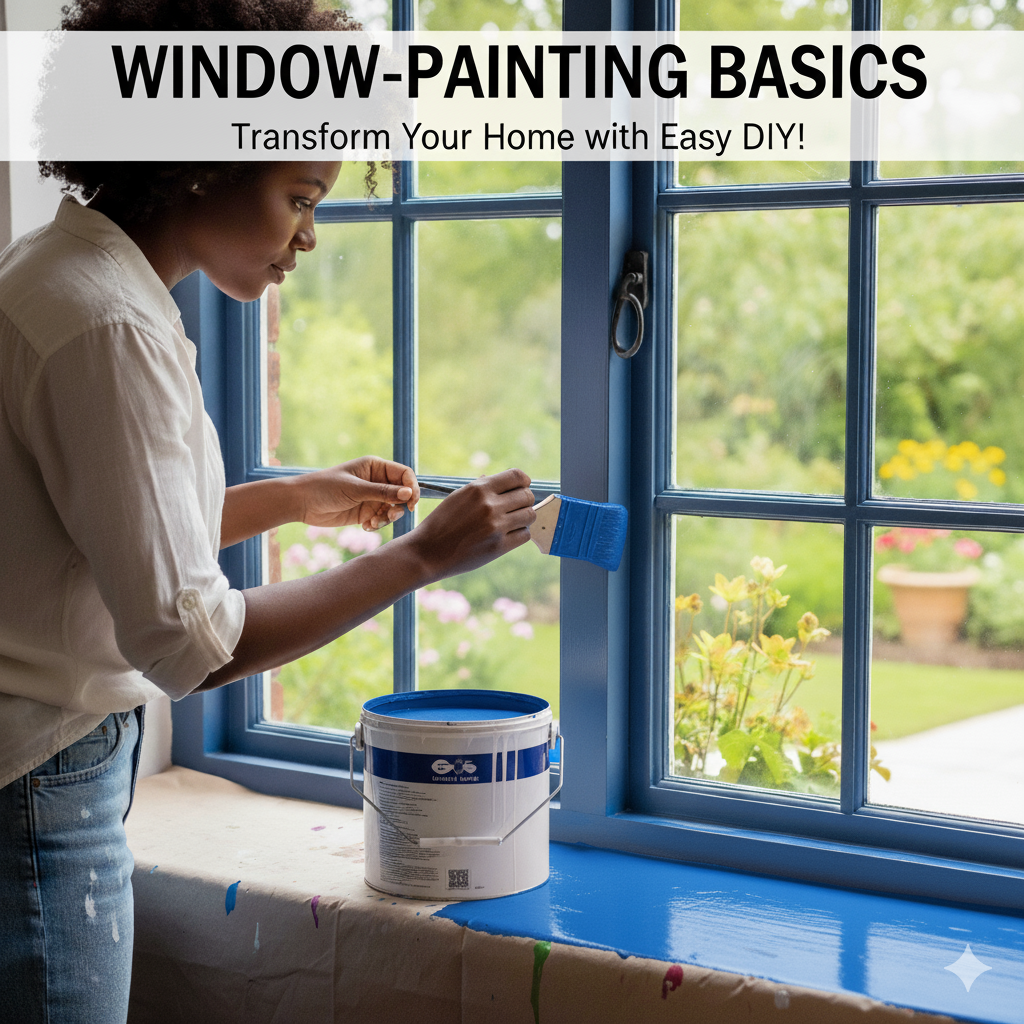
Windows and sills work hard, taking a beating from sun, rain, and condensation, holding potted plants, and being opened and closed repeatedly.
They deserve a high-quality, smooth, and durable finish, but it’s not always an easy job. The sheer number of separate pieces is a challenge. The casing, the sill or stool, and the sashes with muntins (thin wooden strips that separate the Lights, or panes, of glass) all need to be covered with paint, yet the panes must be completely paint-free.
Good prep work is essential when painting windows—the worse they are, the more it takes. Chips and blistering are common on windows, requiring a scraper and sandpaper. You’ll also want to sand and degloss the existing finish-even if it’s in good condition—so that the new finish will adhere. Mask off the glass and the surrounding wall to decrease cleanup time, but be prepared with new razor blades to clean off any paint that still adheres to the glass.
Finally, reduce frustration on this somewhat finicky job by purchasing a 1½-inch angled sash brush—it’s a good choice for most situations.
1. Scrape and sand damaged areas. If either sash is painted shut, free it with a sash saw. Slip the blade into the crack, working the blade back and forth to break the paint bond Wash greasy or dirty areas with TSP solution (see ….). Being careful not to scratch the glass, remove loose paint with a scraper. Sand to remove the sheen from glossy paints and blend in scraped areas. Remove the dust with a tack cloth.

2. Fill holes and caulk any gaps. Use wood putty to fill holes or gouges, leveling it with a putty knife. Run a bead of paintable caulk along any gaps between the wall and the window frame; smooth

3.If possible, remove the sashes. If you paint them on sawhorses; it’s easier to avoid runs On many newer windows, the sashes pop out with little trouble.
On older windows, you can paint the sashes in place or carefully pry off the side trim before removing the sashes.(Use a wide, stiff putty knife before graduating to a pry bar, which might leave marks.

4. Mask panes and the surrounding wall. If painting the sashes in place, as shown here, use painter’s masking tape to avoid getting primer and paint on the glass and wall.

5. Apply tinted primer with a sash brush. If the window has snap-out grilles, remove them to paint. If it has muntins, paint them first Next paint all horizontal parts of the sash, followed by the verticals, and finally the sill (painting in this order limits drips). To keep sashes from sticking, don’t prime or paint the sides of the windows or the track in which they travel. If priming the sashes in place, raise and lower them lo get to surfaces that are inaccessible when the window is closed; also move them as the primer dries to prevent sticking.

6 Apply one or more finishcoats. Again using the sash brush, apply paint the same way you applied primer. If you used a tinted primer, one top coat may be enough. If the primer shows through or an edge didn’t get painted, apply a second top coat

7. Remove masking tape from the glass as soon as the paint skins over to prevent pulling up the paint later. Fix mistakes by drawing a sharp utility knife along the edges of each pane, leaving a thin margin of paint on the glass; push a window scraper or single edge razor blade toward this cut line to remove the excess paint.

WORK SMART
DON’T PAINT THE CRACKS
Painting the crack between the frame and window sash is a no-no.
Once the paint dries, you’ll be unable to open the window (This may be helpful if you are trying to eliminate all air infiltration permanently). To avoid the problem, brush the sash and the frame in two separate strokes, using a minimum amount of paint. Move the sash up and down a few times as the paint dries.

TOOL TIP
DO GET THE WINDOW OPEN
Windows must be able to open for safety.
Use a sash knife to open windows sealed shut by dried paint. Or try a utility knife or a hacksaw
blade. Sometimes
a good tap with a rubber mallet is enough to open it.
Once the window opens, mask off the painted areas and spray the tracks with silicone spray for lubrication. Avoid getting the spray on finished areas because it will make it difficult for paint to adhere.

WORK SMART
TRIM LASTS LONGER
Use neutral colors for painted trim and save bolder colors for the walls. Later, if you change the color of the room, you won’t have to repaint the trim, which is far more tedious to paint than walls.


Leave a Reply