
Home > Paint > Painting exteriors
The skill level; time to complete; materials; and tools required to remove wallpaper is as follows:
Skill level: 1
🔘⚪️ ⚪️⚪️ ⚪️
Time to complete:
Experienced: Variable
Handy: Variable
Novice: Variable
Materials:*
- SP/bleach solution (or a phosphate-free cleaner)
- wood filler
- glazing compound
- caulk
- tape
- oil-base primer
Tools:*
- Putty knife
- brood knife
- grinder
- sander
- wire brush
- broom
- caulking gun
- hammer
- screwdiver
- garden hose
- garbage bags or drop cloths or tarps
- paintbrush
Click on the above links to purchase paint materials and tools online from the Amazon store.
*Disclaimer: This pages contains Amazon affiliate links and other affiliate links. That means that if you click a link and decide to make a purchase I will receive a commission at no extra cost to you.
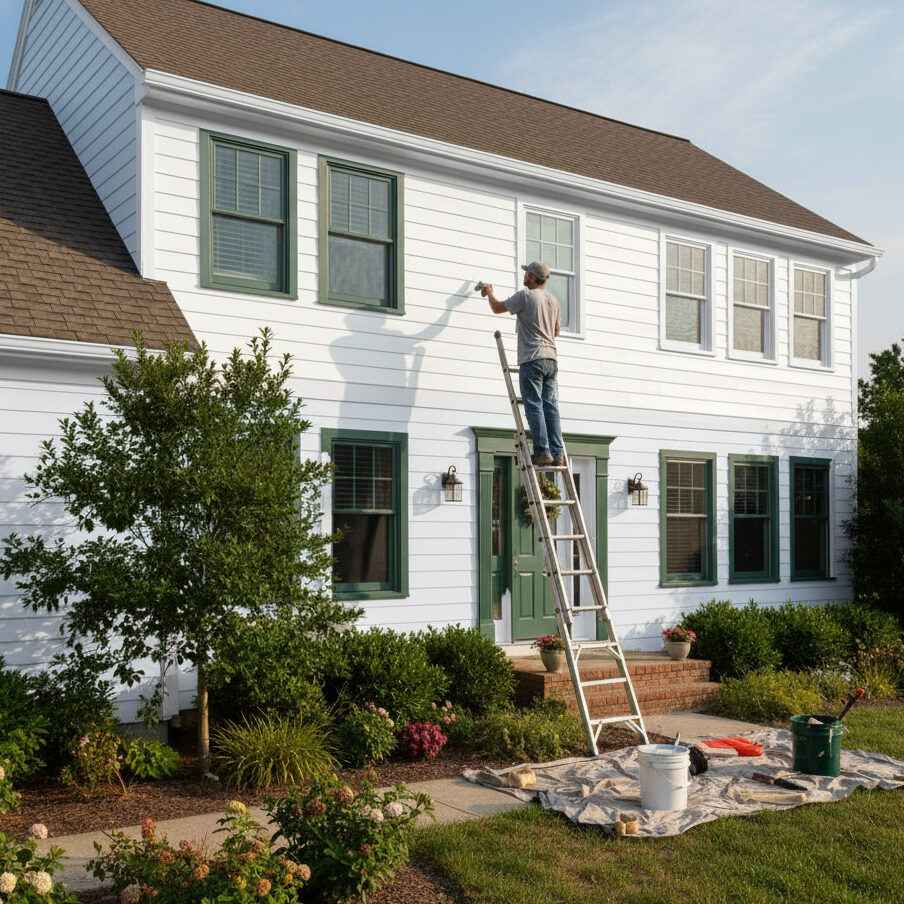
How to paint the exterior
Good preparation washing the patching rot or damage-is undoubtedly the most important step in exterior painting.
Until recently there were only two ways to get paint off your siding: scrapers and disk sanders; both involved a lot of work.
If paint on your siding is in relatively good condition, a scraper may still be the best bet.
If the paint is rough, though, new tools help solve the problem. One is a sander with a housing that fits around the disk.
The housing rides on the surface you’re sanding, allowing you to sand, but not deep enough to damage the surface.
The other tools mount on a power drill and also have carbide sandpaper, either on a drum or on flaps that spin at high speed to remove the paint.
Painting a house is a lot of work, so unless you’re changing colors, break the job down into a series of smaller projects— one side every few months or a year, perhaps, then the trim, and then some time off before you start again.
Preparation Steps:
Step 1. Cover exterior HVAC units and vents with plastic and tape, after first turning off the air-conditioning and exhaust fans. Trim or tie back limbs or bushes that touch the house, covering all plants in the work area with plastic garbage bags, drop cloths, or tarps.

Step 2. Remove shutters and hardware and close storm windows. Repair the siding and trim as necessary and fill rotted or insect-damaged areas with exterior grade wood filler or a two-part epoxy filler.
Remove shutters and hardware, then close storm windows. Subsequently, repair siding and trim as necessary, utilizing exterior-grade wood filler or a two-part epoxy filler to rectify rotted or insect-damaged areas.

The preparation phase requires removal of shutters and hardware and closing storm windows. Repair all necessary siding and trim, followed by filling deteriorated areas (rot/insect damage) with either an exterior-grade wood filler or two-part epoxy.

Step 3. Reglaze the windows as needed. If the old glazing is cracked and falling out, pry out the old putty with a chisel or putty knife and apply new glazing. When you remove the old putty, be careful not to exert so much pressure that you break the glass.

Step 4, Clean the siding and trim by washing it with a TSP (trisodium phosphate and bleach solution or a phosphatefree TSP substitute. Apply it with a scrub brush in 8×8′ sections and let the solution work, without any more scrubbing on your part.

Step 5. Rinse the entire house with a garden hose and water until the runoff water is clear and the solution is completely gone; residue will keep the paint from adhering. Let the siding and trim dry completely, usually about two days, before painting.

Step 6. While cleaning, don’t forget to clean the soffits and the area under the porch roof. These are nearly impossible to sand. Power wash them with TSP/bleach solution instead. Set the spray to remove the loose paint, but don’t set it so hard that you cause damage to the wood.

Step 7. Remove loose paint with a tool made for the job. Scrape off paint in areas a sander won’t reach. If sanding, start with a coarse (16, 24-, or 36-grit) disc. Sand the bottom edges of the siding even if the surface seems sound. A sander cuts through paint quickly- avoid damaging the siding. When you’re done, resand with a 60-grit disc to remove swirl marks that may be visible under paint.

Step 8. Remove dust from the sanded areas and also areas around them with a paintbrush. Prime all bare areas with an oil-base primer made by the manufacturer of the paint you’ll use (so it will be compatible) Oil-base primer is the most durable, and contrary to prevailing wisdom, you can apply latex paint over it.

Basic techniques
After washing, wait until the surface is dry and make sure there is no rain in the forecast.
Apply primer to any bare siding. Wood contains resins that bleed through water-base paints, so use an oil-base primer.
Let the primer dry as long as the manufacturer recommends.

On masonry walls, prime the entire surface.
Masonry surtaces can usually be painted with a roller.
For brick walls, get one with a long nap-up to 1 inch thick-so paint can get into all the nooks and crannies.

Paint the roof trim and soffits first if they will be a different color from the walls. This keeps trim paint from dripping onto newly painted walls.

Mask the siding and paint the trim. Use a corner roller or trim brush to cut in these areas.

SAFETY ALERT
STARTLING DISCOVERY
Beware of hidden bee and animal nests when working at high elevations. Sudden surprises can cause serious injuries from falls.
Many painters routinely keep a can of bee and hornet spray on hand when they paint outside; it can shoot a stream of spray into nests up to 20 feet away. One type of bee, called the carpenter bee, makes its nest in wood, entering through the ½-inch-wide round holes it drills Be on the lookout for such holes, especially in soffits and the lip of fascia boards, and under decks.
TOOL TIP
LADDER SAFETY
Working with tall ladders can be tricky and dangerous unless you follow a lew guidelines. Whatever the height of the ladde its feel should be placed on the ground al a distance one fourth of that height lan 8 fool ladder should have its feet 2 feet away from the house, for instance).
Make sure the legs are on a level surface; on uneven surfaces, use wood shims or blocks to level them

If the surface slopes away from the house, place a 2×4 across the base of the ladder and drive two 2×4 stakes into the ground to secure the ladder base.
Use ladder boots (see Step 1, ) or wrap cloth around the tops of the ladder legs lo keep them from slipping or making dents in the siding
Don’t take a chance on being injured – be careful and ask for help when you need it.

SAFETY ALERT
HANDLING A LADDER
Have a helper stand at the end of the ladder nearest the house, with a foot on each leg to brace it. Grab the other end, liff the ladder up over your head, and hold it by a rung

Take a step forward, moving your hand to the next rung as you do. Continue walking toward your helper, moving your hands and body forward one rung al a lime.

When you get close enough, have he helper grab a rung too so that you are both holding the ladder as it approaches vertical.

Once the ladder is vertical, trade roles with your helper. You become the anchor, placing your feet against the base of the ladder.

Have the helper hold the ladder and slowly back up, until it is leaning against the house. Make sure both feet are level and secure. Extend the ladder to the desired height by holding it just away from the house and using the rope to pull the extension ladder up.

Reverse the process to take the ladder down. Put your feet against the base of the ladder as an anchor.
Have your helper walk the ladder back toward you. Once it is vertical, let your helper act as the anchor while you walk backward to lower the ladder.

TOOL TIP
SPRAY GUNS
A spray gun speeds up a paint job immensely.
When painting an entire house, price shouldn’t be the deciding factor. You’ll probably find that the gun the pros use is best-and expensive. Think about renting good equipment rather then buying inexpensive, mediocre equipment A good spray gun is comfortable to hold, doesn’t clog, and puts out enough paint for the job. The shape of the mist coming out of the gun, called the pattern, is important too— you need to be able to adjust it easily. Talk to your dealer about how to get the right pattern.

Select the right caulk
| Caulk Type | General Advantages | General Limitations |
| Acrylic or siliconized acrylic | • Good for most exteriors • Fully paintable • Easy to use | • Buy the kind that lasts longest |
| Butyl rubber | • Not recommended | • Shrinks, cracks, breaks • Cleans up with solvent • Hard to use |
| Elastomeric | • Flexible • Fully paintable • Cleans up with water • Bridges gaps to ½-inch wide | • Buy the kind that lasts longest |
| Latex | • Inexpensive | • Hardens and cracks • Not recommended for exteriors |
| Polyurethane | • Paintable • Extremely flexible • Adheres to almost any surface | • Hard to apply neatly • Cleans up with mineral spirits • More expensive |
| Silicone | • Adheres best • Lasts longest | • Not paintable • Hard to correct mistakes |


Leave a Reply