
Home > Paint > Painting exterior walls
The skill level; time to complete; materials; and tools required to remove wallpaper is as follows:
Skill level: 1
🔘⚪️ ⚪️⚪️ ⚪️
Time to complete:
Experienced: Variable
Handy: Variable
Novice: Variable
Materials:*
- Exterior house paint
- exterior trim paint
Tools:*
- Paintbrush
- trim brush
- foam pod
- extension ladder
- stepladder
- edge roller
- wire brush
- 2 inch putty knite
- wide putty knife
- soft-bristled brush
Click on the above links to purchase paint materials and tools online from the Amazon store.
*Disclaimer: This pages contains Amazon affiliate links and other affiliate links. That means that if you click a link and decide to make a purchase I will receive a commission at no extra cost to you.
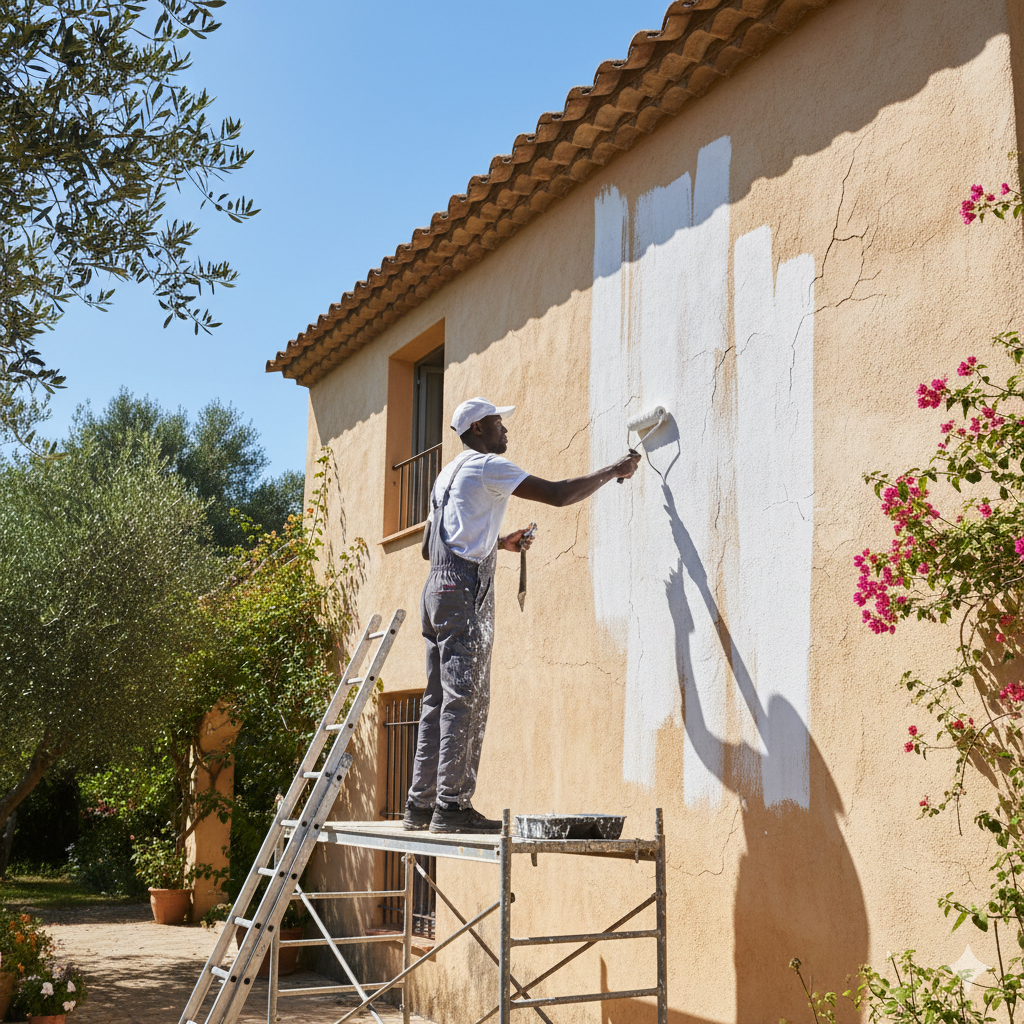
How to paint exterior walls
Painting exterior walls is more complex than painting interior walls in some respects. Various construction materials require different equipment and painting techniques. You’re apt to be working higher from the ground as well. On the plus side, a slight mistake on the second Hoor isn’t nearly as obvious as one inside at eye level.
Siding material ranges from board-and-batten, cedar lap, cement board, masonite, and wood shakes to stucco and masonry.
But basics are basics and, whatever you’re painting, you’ll follow the principles discussed here.
Use quality ladders and scaffolds in proper working condition to ensure a smooth and safe job. You are quite literally trusting your life to this equipment, so buy or rent the best available.
Steps on how to paint exterior walls:
Step 1. Start at the peak of the roof with the ladder centered on the wall. Paint three or four pieces of siding, working from one eave across to the other. Notice the ladder boots that fit over the ladder tops to protect the siding and prevent the ladder from slipping. These cost only a few dollars and are available in most paint departments. (See the ladder precautions____)

Step 2. Move the ladder down a couple of rungs, then work your way across the top of the wall again. Be very careful not to overreach -tipping the ladder over or falling off can cause serious injury

Step 3. Lower the ladder again, and move it over to one side of the house. Paint two or three boards, starting on the side, working across the top of the ladder, and painting as much as you can reach comfortably on the other side. Lefties generally like to start on the left, right-handed painters generally like to start on the right.

Step 4. Relocate the ladder to access the newly painted section of siding. To avoid lap marks, repaint the edges of the previously painted area as you initiate each stroke. Commence at the side and paint across the top of the ladder to the opposite side. Repeat the process, painting only accessible areas before repositioning or lowering the ladder. Continue until the entire side is painted. ✅

Steps on how to paint stucco
Step 1. Scrub around windows and doors with water and a wire brush, and then wash the rest of the surface with a garden hose Clean away loose paint with a wire brush and a putty knife (if the surface is smooth enough to use onel

Step 2. Roll on acrylic-latex masonry primer and check for cracks or rust marks on the stucco. When the primer is dry, patch the cracks with vinyl concrete patch or elastomeric (synthetic rubber) stucco patch, applying it with a flexible 2-inch putty knife. While the patch is still wet, dip a wider knife in some water and skim over the face of the stucco to remove excess patch material and smooth it. Caulk narrower cracks with concrete repair caulk.

3. After the patch dries, spot prime the repairs, and also any discoloration. Roll on a finish coat of acrylic-latex paint (read the label carefully and use only paint that is specifically formulated for stuccol

Steps on how to paint board-and-batten
Step 1. Pressure wash the walls, staying away from windows and doors so water won’t leak through and stain the inside surfaces. Clean around doors and windows by scrubbing with a scrub brush. Once the wood is dry (up to 2 days), caulk along the space between the batten and board with a 20- or 30-year paintable caulk Wet your finger and smooth the caulk, or put on disposable gloves before wetting your finger and smoothing it.

Step 2. Prime with a latex or oil primer, tinted to match the finish coat. Prime the edges of the horizontal board above the siding (called the frieze) and the bottom kick board too, if you have these. Working from the top down, brush primer on the face and edges of the battens and also the sides of the boards.

Step 3. Roll primer onto the face of the first board, working from the top down and across the building Let the primer dry, and apply a top coal of cover acrylic-latex in the same order.

WORK SMART
PAINT PADS
If you’re painting clapboard siding, check into using handy painting pads. Easier to wield than a brush, a pad can cover the entire width of the siding in one pass. Some pads are even shaped to paint corners. They do require frequent reloading with paint

Steps on how to paint vinyl or aluminum siding
Step 1. Examine the siding and replace any pieces that are damaged or cracked. Pressure-wash the siding, but stay away from windows and doors where water can leak through and stain the inside walls. Clean around doors and windows with a soft-bristled scrub brush.

Step 2. Brush on an acrylic-latex stain-blocking primer. (Read the label before buying, and use only one that specifically states it is suitable for aluminum or vinyl-whichever surface you’re painting.)

Step 3. When the primer has dried, apply an acrylic-latex top coat-again, one designed for the surface you’re painting. Don’t select a color darker than the original; it will absorb more heat and may even cause the siding to warp.

Steps on how to paint concrete
Step 1. Pressure-wash the surface and scrape off any flaking paint or raised areas with a putty knife.

Step 2. Painted concrete sometimes shows shiny and dull spots if the right primer isn’t used. Prime the entire wall with an acrylic-latex stain-blocking primer specifically designed for masonry. (Some masonry paints double as primers, but these usually leave shiny spots. Stick with a stain-blocking primer.)

Step 3. Repair any cracks with a specially formulated masonry repair caulk. Work the caulk in with a damp finger or rag, removing the excess with a damp sponge. When the caulk dries, roll on acrylic-latex masonry paint. This paint dries to the touch in 24 hours but may take up to 30 days to fully cure


Leave a Reply