
The skill level; time to complete; materials; and tools required to Prepare to paint is as follows:
Skill level: 1
🔘🔘 ⚪️⚪️ ⚪️
Time to complete:
Experienced: 5 hrs
Handy: 6 hrs
Novice: 12 hrs
Materials:*
- Semigloss latex paint for base coat
- second-color latex paint for glaze coat
- latex glaze
- disposable latex gloves
- blue painter’s masking tape
Tools:*
- Natural sea sponge
- lint-free rags
- measuring cup or paint bucket with marked measurements
- stepladder
- roller and pan for base coat
- small plate for glaze
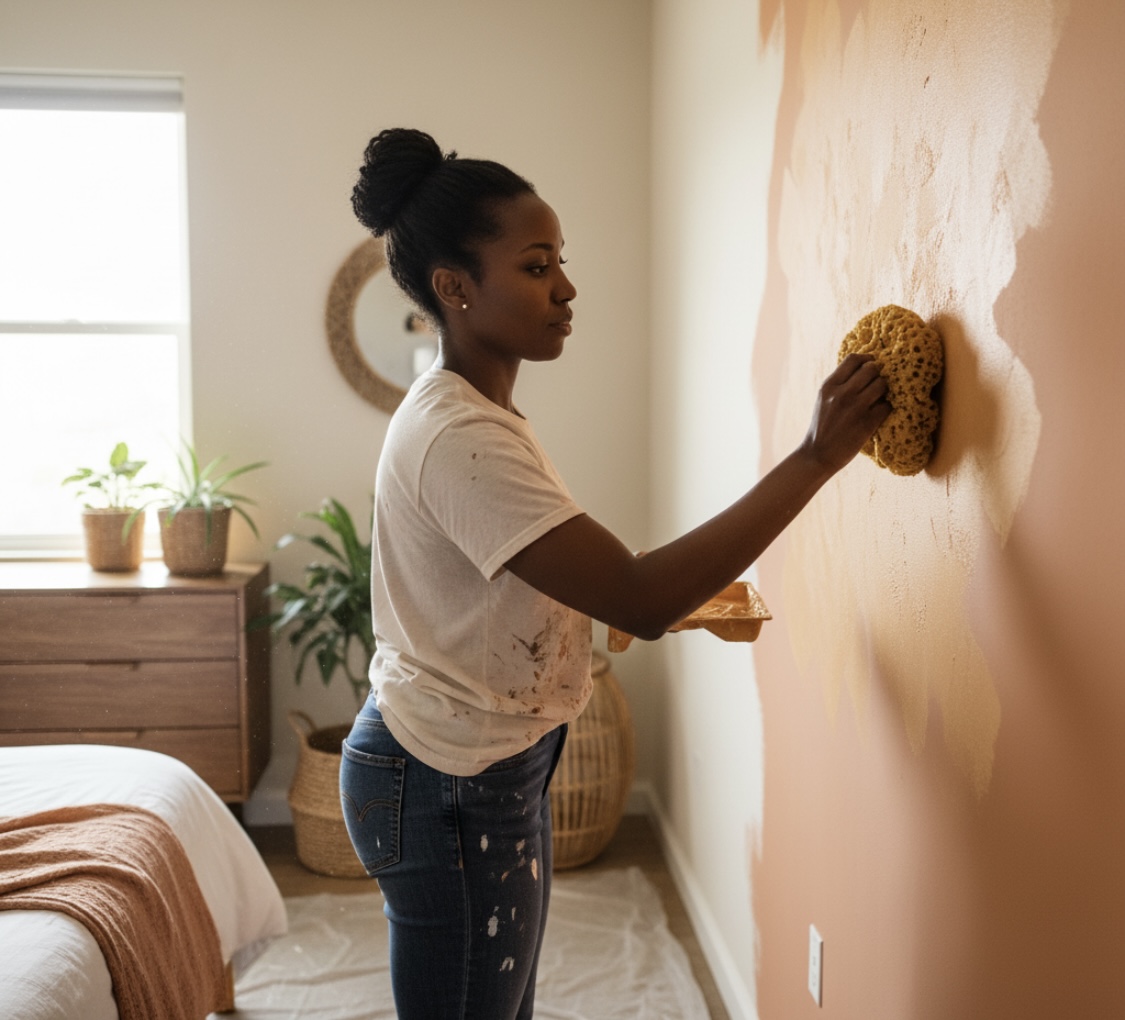
Sponging is a popular way to apply a second color to a wall. After you apply a base coat in the first color, you either apply a glaze mixture in the second color with a sponge (sponge on), or roll it on and then sponge off the excess. Sponging on makes the base color more dominant; sponging off draws more attention to the second color.
Choose the right sponge
Natural sea sponges work best—random holes and varying textures create more varied patterns than factory-made synthetic sponges. Most paint departments carry sea sponges. You’ll need a large one and also a small one (or a torn-off piece) for the edges and corners.
Glaze is the key
Glaze, sold in most paint departments, is a neutral finish with no added pigment—it comes in both latex and oil bases. Mixing paint with glaze slows the drying time and makes the paint translucent. Use latex paint and glaze for easy cleanup with water. A ratio of one part paint to four parts glaze works well, but you might experiment with different ratios or even add metallic or pearlized powders to the mix. Most painters prefer a semigloss base coat.
Practice makes perfect
Paint white poster board or a scrap of drywall with the base coat and let it dry. Mix the glaze and sponge on or off to see how it looks over the base coat-remember that paint changes color when it dries. When you’re happy with your technique, it’s time to begin on the actual walls.

Sponging on
Steps for applying paint with a sponge:
Step 1. Start sponging in an upper corner. Dip the sponge in water, squeezing out the excess, and dip it into a small dish of glaze (keep it in your other hand). Rotating the sponge or your wrist slightly each time varies the pattern.

Step 2. Sponge diagonally from the top to the bottom of the wall in a swath as wide as your arm is long.

Step 3. Blot the sponge on a clean rag after you dip it in the dish of glaze otherwise, the sponge is likely to leave blotches)

Step 4. Step back and look at the results occasionally. If you need to add more glaze, this is the time, but don’t work the glaze too much.

Step 5. If some spots have too much glaze, go back after the glaze dries and sponge on more of the base coat

Step 6. After the previous glaze color dries, sponge on additional color|s), if you like, for more complexity

Picking color combinations
It may be dramatic to use a high-contrast base coat and glaze coat (black against white, for instance). Most people, though, find it easier to live with more subtle gradations in color. When selecting from color chips, pick a base color and then choose a glaze color two or three gradients away from it, or use one of the combinations recommended by the paint company.


WORK SMART
TIPS FROM THE PROS
Sponging is easy, once you get the hang of it.
Follow some simple tips to make your finished results look even better.
Mask off: It’s almost impossible not to get paint on an adjacent wall when you’re sponging an inside corner.
Mask the wall with painter’s masking tape, do the first wall, and let it dry. Then tape off that wall and sponge the other one
Reach small areas: Tear off a little piece of sponge and use it for tight spaces and inside corners.
• Stand back: Every few minutes, check to see how your job looks from a slight distance. Watch for blotchiness (sponge closer together), too-light or too dark areas (reload the sponge with paint as necessary, but blot it each timel, and missed areas (you can always go back).
Vary the pattern: use different parts of the sponge, but don’t twist the sponge while it’s touching the wall A light touch gives the best finish
Don’t overwork the paint: Let each coat dry before doing another. Overworked sponging looks muddy
Sponging on and off
The how-to shots on these pages show the sponging on lechnique, which lets the base coat color predominate. The sponging off technique puts more emphasis on the glaze color: roll the entire wall with glaze; then use a clean, damp sponge to remove some of it, rinsing the sponge with clean water as needed. Notice the difference between the samples below: Even using the same colors, results can vary widely.
Sponging on a diluted glaze shows more of the yellow base coat, which now looks dominant. 🔻

Sponging off leaves a much denser layer of the greenish glaze, and the yellow base coat recedes.🔻

Leave a Reply