Transforming an Unused Backyard Corner into a Functional Putting Green
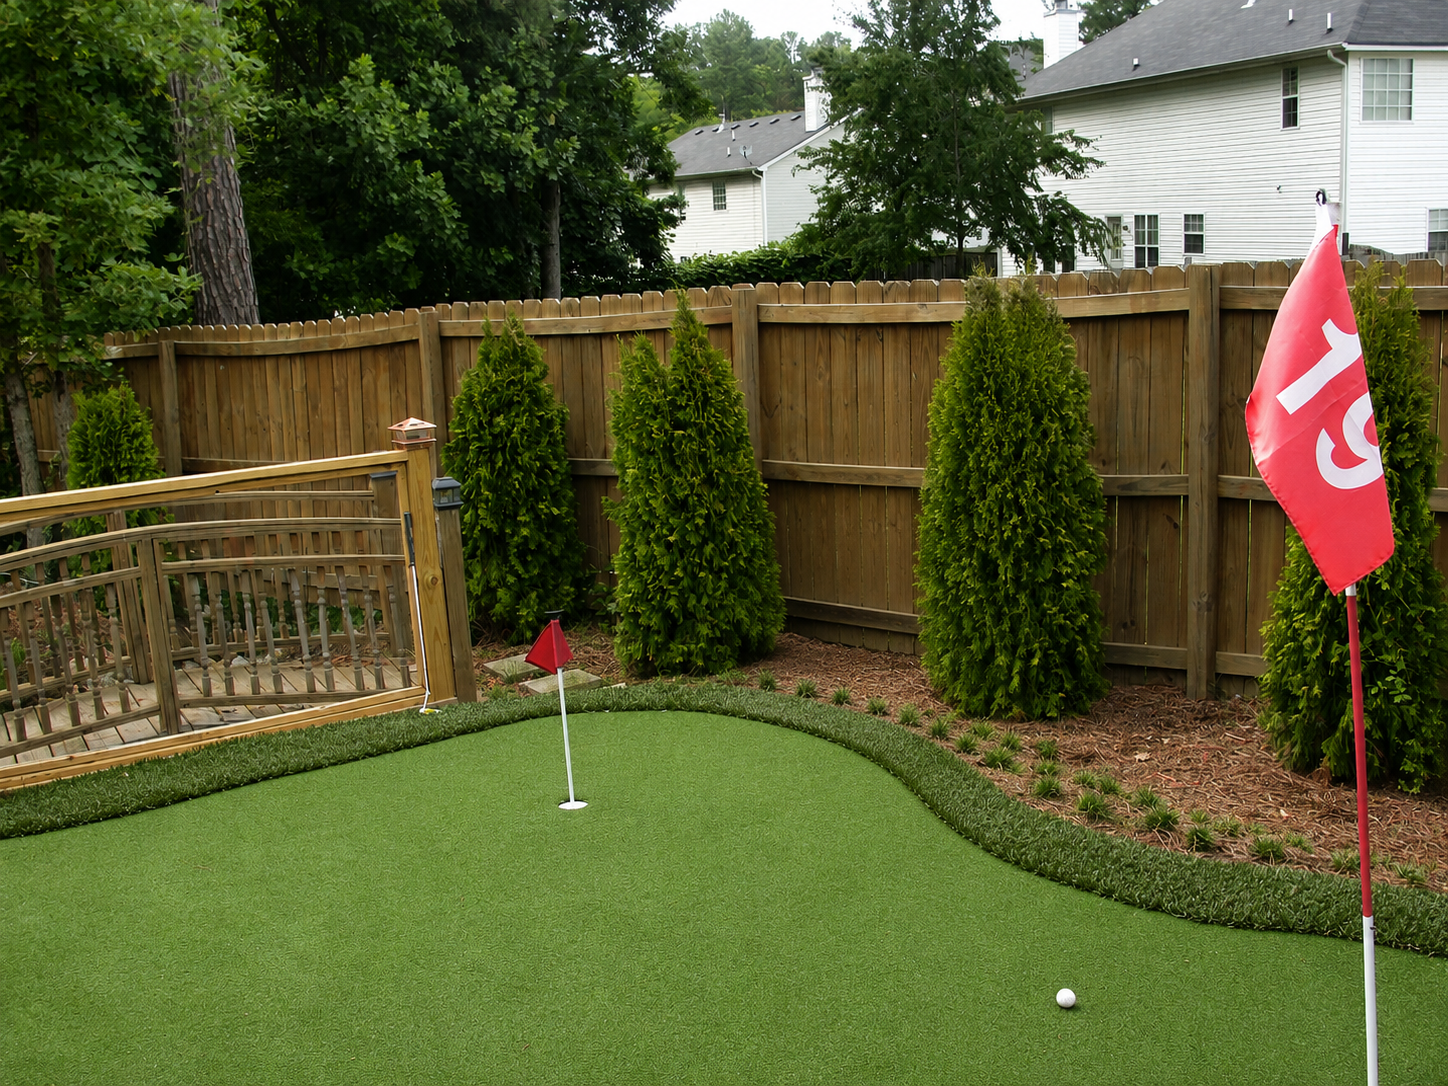
Sometimes the best home improvement projects solve two problems at once. In my backyard, I had an unsightly stormwater drain located in the corner behind my swimming pool. Although it served an important purpose by collecting runoff water from the street, it wasn’t exactly an attractive feature to look at every day. Rather than simply covering it with decorative rock or plants, I decided to turn that unused corner into something both beautiful and functional—a small backyard putting green.
The result was one of my favorite DIY landscaping projects. Not only did it completely hide the drainage area, but it also created a fun golf practice area that blends naturally into the rest of the backyard. In this article, I’ll walk you through exactly how I planned, built, and finished this DIY backyard putting green while still allowing the drainage system underneath to function properly.
Why I Built This Backyard Putting Green

The corner behind my pool wasn’t being used for anything useful. It contained a drainage inlet surrounded by large rocks that prevented erosion and allowed stormwater to flow freely. While the drainage worked perfectly, it looked unfinished compared to the rest of my landscaped backyard.
My goals were simple:
- Hide the drainage rocks
- Improve the backyard appearance
- Create a relaxing golf practice area
- Preserve proper drainage
- Add value to my outdoor living space
Instead of seeing an eyesore every time I looked across the yard, I now see one of my favorite features.
Planning the Project


Before moving any materials, I carefully measured the area.
Planning included:
- Determining the final size
- Locating the storm drain
- Ensuring water could still reach the drain
- Designing gentle slopes for golf balls
- Selecting turf and edging materials
One of the most important parts of this project was making sure the drain would continue functioning exactly as designed.
Materials and Tools
Materials
- Artificial putting green turf
- Landscape fabric
- Crushed stone
- Stone dust
- Pressure-treated landscape edging
- Golf cup
- Flagstick
- Drainage rock
- Landscape spikes
- Nails and screws
Tools
- Shovel
- Wheelbarrow
- Level
- Landscape rake
- Plate compactor or hand tamper
- Utility knife
- Drill
- Tape measure
- Circular saw
- Hammer
Preparing the Area


I began by clearing away grass and leveling the ground while leaving the drainage rocks surrounding the storm drain intact. Since the drainage system already worked well, I wanted to build around it instead of disturbing it.
The goal was creating a stable foundation while maintaining positive drainage beneath the putting green.
Building the Base


A quality base determines how well a putting green performs.
I installed:
- Compacted crushed stone
- A leveling layer of stone dust
- Slight contours for realistic ball movement
- Proper drainage paths
Taking extra time during this stage paid off later by producing a smooth, consistent putting surface.
Installing the Landscape Border
The border serves several important purposes:
- Holds the base materials in place
- Defines the shape
- Prevents erosion
- Creates a finished appearance
- Makes mowing easier
I carefully secured each piece so the border would remain straight and durable for years.
Installing the Artificial Putting Green


After preparing the base, I rolled out the artificial putting green turf and carefully positioned it before trimming the edges.
Once satisfied with the fit, I:
- Cut the hole location
- Installed the golf cup
- Secured the turf
- Trimmed around the border
- Brushed the fibers upright
The transformation happened almost instantly.
Hiding the Storm Drain


The most satisfying part of this project was successfully disguising the drainage area.
Instead of seeing exposed rocks and a storm drain bulkhead, visitors now notice an attractive golf green. Beneath the surface, the drainage system continues directing stormwater exactly as intended.
Because I left open drainage pathways beneath the turf and around the rock-filled area, water can still flow freely into the drain during heavy rain.
This project proves that functionality and appearance can work together.
Adding the Finishing Details


To complete the project, I added:
- Fresh mulch
- Decorative shrubs
- Clean landscape edging
- Smooth transitions to the lawn
- Finished trimming around the pool area
These finishing touches made the putting green look like it had always been part of the backyard.
The Finished Transformation


The final result completely transformed an unused corner into an attractive outdoor feature.
Instead of an exposed drainage area, the backyard now includes:
- A functional golf practice green
- Hidden drainage
- Better curb appeal
- Improved landscaping
- More usable outdoor space
- A unique conversation piece
Best of all, the storm drain still performs its job during every rainstorm.
Lessons I Learned
This project reinforced several valuable lessons:
- Proper planning prevents future problems.
- Never block an active drainage system.
- A strong foundation creates better results.
- Quality turf looks remarkably realistic.
- Landscaping can hide functional infrastructure without sacrificing performance.
- Small projects can make a huge visual impact.
🔔 Safety Alerts — avoid dangerous mistakes
Always contact your local utility locating service before digging. Verify the location of underground utility lines, irrigation systems, electrical wiring, gas lines, and communication cables before excavation begins.
🛠️ Tool Tips — use tools the right way
Renting a plate compactor for a single day can dramatically improve the finished surface compared to using only a hand tamper. A properly compacted base helps prevent settling and keeps the putting surface smooth for years.
💰 Buyer’s Guides — choose better materials
When selecting artificial putting green turf, look for products specifically designed for golf rather than standard landscape turf. Golf turf provides a tighter weave, smoother ball roll, better durability, and a more realistic putting experience. Investing in quality materials reduces maintenance and improves the overall appearance.
✅ Work Smart Tips — save time and reduce frustration
Before permanently securing the turf, roll several golf balls across different sections of the surface. This simple test helps identify any high or low spots that should be corrected before the installation is complete.
😬 Common Mistakes — learn what to avoid
Many DIY builders make the mistake of skipping proper base preparation or blocking existing drainage paths. Others underestimate the importance of compaction, resulting in uneven surfaces over time. Taking extra time to build a stable foundation and preserve water flow will produce a much better long-term result.
🖌️ Design Tips — improve the finished look
Blend the putting green into the surrounding landscape by using curved borders, decorative mulch, ornamental shrubs, and smooth transitions to the lawn. Avoid sharp geometric edges whenever possible to create a more natural appearance.
Frequently Asked Questions
Can you build a putting green over a storm drain?
Yes, provided the drain remains fully functional. The project should be designed so water can still flow freely into the drainage system without obstruction.
Is artificial turf difficult to maintain?
No. Occasional brushing, leaf removal, and rinsing are generally all that’s needed to keep the surface looking and performing well.
How long does a DIY putting green last?
With proper installation and quality materials, an artificial putting green can provide many years of use with minimal maintenance.
Is this project suitable for beginners?
Yes. With careful planning, accurate measurements, and patience during base preparation, many homeowners can complete a small backyard putting green as a weekend DIY project.
Final Thoughts
Building this DIY backyard putting green allowed me to solve a practical landscaping challenge while creating an enjoyable recreational feature for my family and guests. By transforming an unattractive storm drainage area into a clean, professional-looking golf practice space, I improved both the appearance and functionality of my backyard.
This project is a great example of how creative DIY thinking can turn a necessary piece of infrastructure into a beautiful design element. With thoughtful planning, proper drainage considerations, and attention to detail, you can create a backyard feature that looks great, performs well, and adds lasting value to your home.
Enjoy More DIY Projects from Conley’s Home Improvement
If you enjoyed this project, be sure to explore more step-by-step DIY home improvement guides, backyard transformations, woodworking projects, landscaping ideas, and renovation tutorials here on Conley’s Home Improvement. Whether you’re a beginner or an experienced DIYer, my goal is to help you build with confidence while avoiding costly mistakes through practical, real-world experience gained over more than 40 years of home improvement projects.