I finally decided to upgrade my backyard this summer because creating functional space makes swimming much more enjoyable. My family feels safer while splashing during hot afternoons. This project changed how we use our outdoor area.
I enjoy helping you achieve similar results with this resource. Sturdy deck platforms don’t just look great; they provide secure spots for lounging or sunbathing. Follow along as I share essential stages for the construction.
Safety is my top priority during water activities. Well-designed wooden structures offer smooth transitions from grass into water while keeping everyone safe. I simplified everything for your renovation journey today.
My goal makes this task feel manageable. You don’t need being pro for professional results. Let us dive into details now so we can turn your vision into a reality.
Key Takeaways
- Enhancing backyard safety and accessibility.
- Planning layouts before purchasing materials.
- Ensuring structural stability and level surfaces.
- Selecting weather-resistant wood for longevity.
- Boosting property value with custom aesthetics.
Why I Decided to Build a Deck Around My Above-Ground Pool
The decision to build a deck around my above-ground pool was driven by the desire to create a safer and more enjoyable outdoor space.
When I first installed my above-ground pool, I was excited to have a fun and relaxing spot for my family and friends. However, I quickly realized that the area around the pool was quite bare and lacked the aesthetic appeal I was hoping for. Moreover, the direct access to the pool was not as safe as I wanted it to be, especially with kids around.
Building a deck around my above-ground pool not only enhanced the safety by providing a stable and secure area around the pool but also improved the overall aesthetics of my backyard. The deck became an extension of my home, creating an inviting space for entertainment and relaxation.
One of the significant benefits of having a pool deck is the increase in property value. A well-designed pool deck can significantly boost your home’s appeal to potential buyers if you ever decide to sell. Additionally, it provides an excellent space for outdoor activities, barbecues, and simply enjoying the sunshine.
Here are some key benefits I experienced after building my above-ground pool deck:
| Benefit | Description |
|---|---|
| Enhanced Safety | Provides a stable area around the pool, reducing the risk of accidents. |
| Improved Aesthetics | Enhances the visual appeal of your backyard, making it more inviting. |
| Increased Property Value | Boosts your home’s value and appeal to potential buyers. |
In conclusion, building a deck around my above-ground pool was a decision that greatly improved my outdoor living experience. It not only made the pool area safer and more enjoyable but also added value to my property.
Planning Your Above-Ground Pool Deck Design
A well-designed pool deck can elevate the entire backyard experience, starting with a thorough planning phase. Planning your above-ground pool deck design is a critical step that sets the stage for a successful construction project.
When it comes to creating an inviting and functional outdoor space, the design of your above-ground pool deck plays a crucial role. It’s not just about building a deck; it’s about crafting an area that complements your pool and enhances your overall backyard experience.
Measuring Your Pool and Available Space
The first step in planning your deck is to measure your pool and the surrounding area. Accurate measurements are crucial to ensure your deck fits perfectly around your pool and utilizes the available space efficiently. Consider the shape of your pool, the location of any obstacles, and the path you want to create for movement around the pool.
Take note of the pool’s dimensions and the distance between the pool and any nearby structures or boundaries. This information will help you determine the size and shape of your deck. It’s also a good idea to sketch out a basic layout of your yard, including the pool, to visualize your deck design.
Choosing the Right Deck Style and Configuration
With your measurements in hand, the next step is to choose a deck style and configuration that suits your needs and complements your home’s architecture. Consider the style of your house, the color scheme, and the overall aesthetic you want to achieve. You might opt for a simple, straightforward design or something more elaborate with multiple levels or features like built-in seating.
Think about how you plan to use your deck. If you enjoy outdoor dining, you might want to include space for a table and chairs. If you have a large family or frequently host gatherings, a larger deck with multiple access points might be necessary.
Understanding Local Building Codes and Permits
Before finalizing your deck design, it’s essential to understand the local building codes and permits required for your project. Building codes can dictate everything from the height of your deck to the type of materials you can use. Checking with your local building authority will ensure your deck is compliant and avoid potential fines or reconstruction.
Research the specific regulations in your area, and don’t hesitate to consult with professionals if you’re unsure about any aspect of the process. Obtaining the necessary permits before you start construction is a critical step that can save you time and money in the long run.
Essential Tools and Materials You’ll Need
A well-planned pool deck construction requires a thorough preparation of tools and materials. To ensure a successful DIY pool deck project, it’s crucial to have the right equipment and supplies at your disposal.
Power Tools and Hand Tools for the Job
To start, you’ll need a variety of power tools and hand tools. Some of the essential power tools include:
- Circular saw for cutting lumber
- Drill for drilling holes and driving screws
- Impact driver for heavy-duty driving tasks
- Jigsaw for curved cuts
- Sander for smoothing out wood surfaces
In addition to power tools, you’ll also need various hand tools, such as:
- Tape measure for measuring and marking lumber
- Level for ensuring accurate installations
- Pliers and wrenches for gripping and twisting objects
- Hammer for tapping and fitting parts together
- Safety glasses for protecting your eyes
Selecting Lumber and Decking Materials
Choosing the right lumber and decking materials is vital for the structural integrity and aesthetic appeal of your pool deck. Consider using:
- Pressure-treated lumber for the frame and support structures
- Composite decking for a durable and low-maintenance surface
- Wood decking for a natural look and feel

Hardware, Fasteners, and Concrete Supplies
To assemble and secure your pool deck, you’ll need various hardware and fasteners, including:
- Decking screws for attaching decking boards
- Joist hangers for supporting joists
- Post anchors for securing support posts
- Concrete mix for setting footings
Safety Equipment and Protective Gear
Safety should be your top priority when working on your DIY pool deck project. Make sure to have:
- Safety glasses for protecting your eyes
- Ear protection for reducing noise exposure
- Steel-toed boots for protecting your feet
- Work gloves for improving grip and protection
By gathering all the necessary tools and materials, you’ll be well-prepared to tackle your pool deck construction project with confidence. For more pool deck building tips, be sure to follow this comprehensive DIY pool deck guide.
Preparing the Site for Pool Deck Construction
Preparing the site is a crucial step in building a safe and durable pool deck around your above-ground pool. This process involves several key steps that ensure your deck is built on a stable and level foundation.
Clearing and Leveling the Ground Around Your Pool
The first task in site preparation is clearing the area around your pool of any debris, vegetation, or obstructions. This not only provides a clean slate for construction but also helps in identifying any potential issues with the terrain.
Once the area is clear, the next step is to level the ground. This is crucial because an uneven surface can lead to structural issues with your deck. Use a level tool and a string line to determine the high and low spots, and then adjust the ground accordingly.

Creating a Stable Foundation with Footings
A stable foundation is essential for the longevity and safety of your pool deck. This is achieved by digging footings for the support posts. The depth and width of these footings will depend on your local building codes and the size of your deck.
It’s critical to ensure that the footings are below the frost line to prevent shifting due to freeze-thaw cycles. Fill the footings with concrete, and allow it to set before proceeding with the construction of your deck’s support frame.
Setting Up Your Work Area Safely
Safety should always be your top priority when constructing a pool deck. Start by marking out the work area with clear signage or barriers to prevent unauthorized access, especially if you have children or pets.
Ensure that your workspace is well-lit, especially if you’re working during the early morning or late evening. Use proper safety gear, including gloves, safety glasses, and a hard hat, to protect yourself from potential hazards.
- Clear the area of debris and obstructions.
- Use proper safety equipment.
- Ensure good lighting in the work area.
By carefully preparing the site for your pool deck construction, you set the stage for a successful project that will provide years of enjoyment and relaxation.
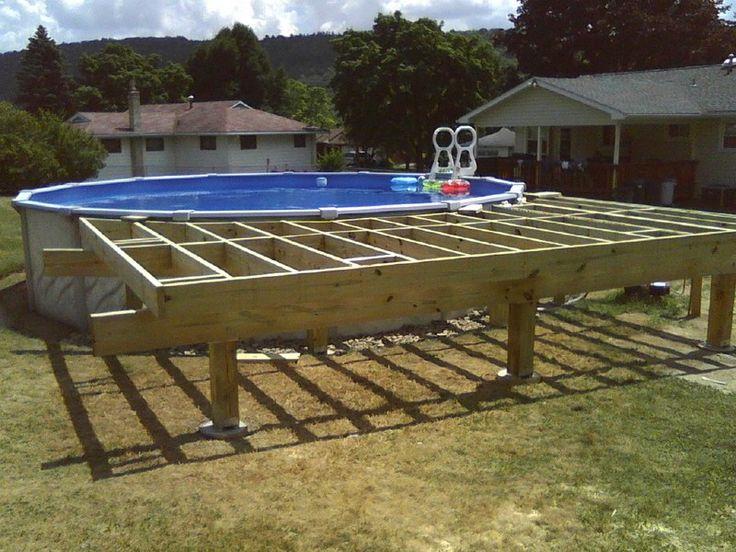
How to Build a Pool Deck Around an Above-Ground Pool Step 1: Constructing the Support Frame
Building a pool deck begins with constructing a solid support frame, a crucial element for the entire structure’s stability. This foundational step ensures your deck is safe, durable, and visually appealing.
Installing Support Posts and Concrete Footings
The first task in constructing the support frame is to install support posts and concrete footings. These elements provide the necessary foundation for your deck, distributing its weight evenly across the ground.
- Mark the locations for your support posts around the pool, ensuring they are evenly spaced and aligned with your deck design.
- Dig holes for the footings, typically 12 inches deep and 18 inches wide, depending on your local building codes.
- Pour concrete into the holes, and set the support posts in place, ensuring they are level and securely positioned.

Building the Outer Perimeter Frame
Once the support posts are set, you can begin building the outer perimeter frame. This frame will define the shape and size of your deck.
Use pressure-treated lumber for the frame to protect it from rot and insect damage. Ensure the frame is square and level, using diagonal measurements to verify its accuracy.
Adding Interior Joists for Structural Support
Interior joists are critical for providing additional structural support to your deck. They help distribute the weight of the decking boards and any additional features like railings or furniture.
- Space the joists evenly, typically 16 inches apart, to provide uniform support.
- Use hangers to secure the joists to the outer frame, ensuring they are level and plumb.
Ensuring Level and Square Construction
To guarantee the stability and safety of your pool deck, it’s crucial to ensure that the support frame is both level and square.
Use a level tool to check the frame’s alignment, and make any necessary adjustments. Verify that the corners are square by measuring the diagonals; they should be equal in length.
By following these steps and paying close attention to detail, you can construct a sturdy support frame for your pool deck, setting the stage for a successful DIY pool deck project.
Step 2: Attaching the Deck Frame to Your Pool
Attaching the deck frame to your pool is a vital step that ensures the structural integrity of your above-ground pool deck. This step is critical because it directly affects the safety and durability of the deck. A securely attached deck frame prevents potential hazards such as deck collapse or shifting, which can occur if the deck is not properly secured to the pool.
Installing Ledger Boards Against the Pool Wall
To begin, you need to install ledger boards against the pool wall. Ledger boards are critical as they provide a nailing surface for the decking boards and help distribute the weight evenly. When installing ledger boards, ensure they are level and securely attached to the pool wall using appropriate fasteners.

Using Proper Fastening Methods for Pool Attachment
The method of fastening the ledger board to the pool wall is crucial. You should use galvanized or stainless steel lag screws that are designed for outdoor use and can withstand the elements. The type and size of the fasteners may vary depending on the pool manufacturer’s recommendations and local building codes.
| Fastener Type | Material | Recommended Use |
|---|---|---|
| Lag Screws | Galvanized Steel | General Use |
| Lag Screws | Stainless Steel | High Corrosion Areas |
| Through-Bolts | Galvanized Steel | Heavy-Duty Applications |
Verifying Structural Stability and Weight Distribution
After attaching the ledger boards, it’s essential to verify the structural stability and weight distribution of your deck. Check that the deck frame is level, securely attached, and can support the intended weight. This includes not just the weight of the decking materials but also the people and furniture that will be on the deck.
To ensure stability, you can perform a simple test by applying weight to different parts of the deck and checking for any signs of sagging or instability. If you notice any issues, you may need to adjust the support structure or consult a professional for further guidance.
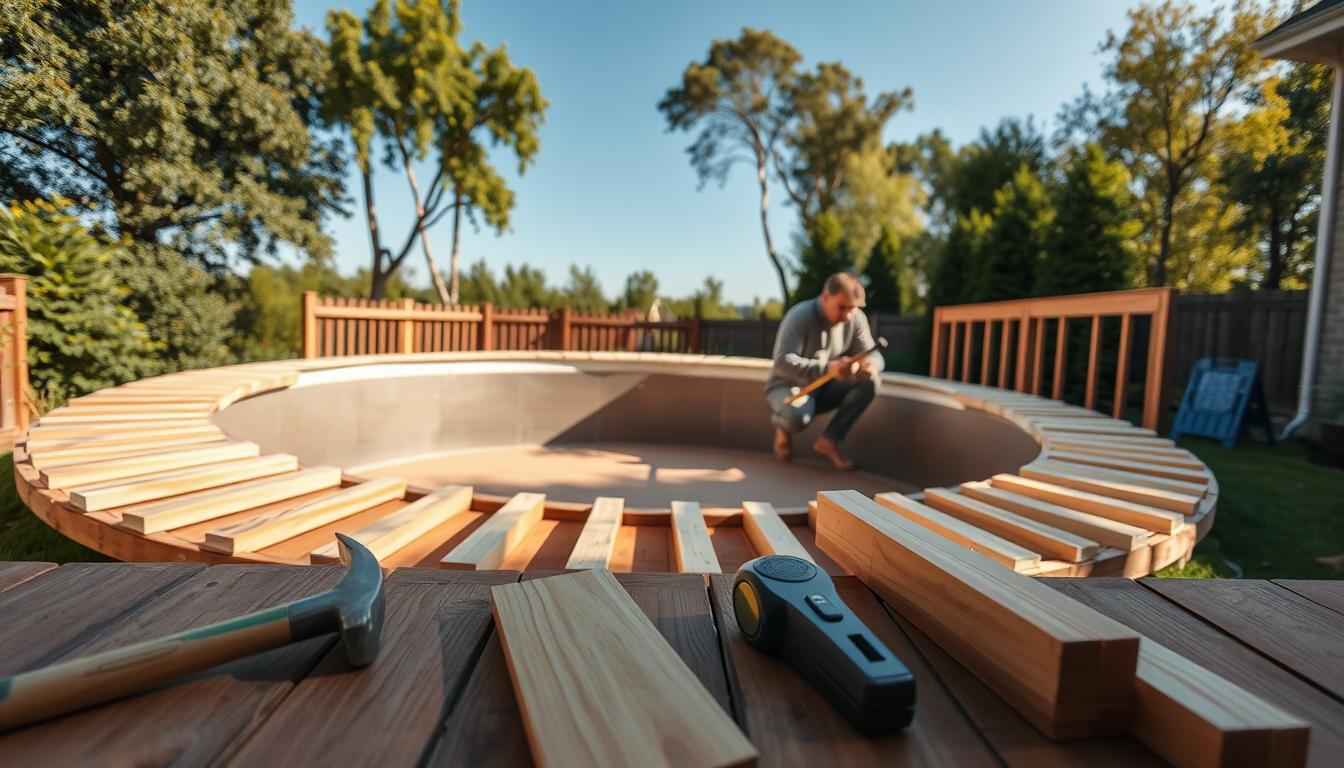
Step 3: Installing Decking Boards and Surface
With the support frame constructed, the next step is to lay down the decking surface. This is a crucial part of the pool deck design process, as it directly affects the appearance and durability of your deck.
Laying Your First Decking Board
Begin by laying your first decking board along the longest side of your pool. Ensure it is straight and aligned with the pool’s edge. Use a level to double-check that the board is perfectly horizontal. For a DIY home improvement project like this, precision is key.

Maintaining Consistent Spacing for Drainage
To ensure proper drainage, it’s essential to maintain consistent spacing between the decking boards. A gap of about 1/4 inch is recommended. This spacing allows water to drain off the deck, reducing the risk of water accumulation and potential slipping hazards.
Cutting and Fitting Boards Around Pool Curves
If your pool has curves or irregular shapes, you’ll need to cut the decking boards to fit around these curves. Use a jigsaw or a circular saw to make precise cuts. For a professional finish, sand the cut edges to smooth them out.
Securing Boards with Screws or Hidden Fasteners
Once the boards are cut and fitted, secure them to the joists using either screws or hidden fasteners. Hidden fasteners provide a cleaner look, as they are not visible on the surface of the decking boards. However, screws are more straightforward to install and can be just as effective if countersunk properly.
| Fastener Type | Advantages | Disadvantages |
|---|---|---|
| Screws | Easy to install, cost-effective | Visible on the surface |
| Hidden Fasteners | Aesthetically pleasing, no visible screws | More challenging to install, potentially more expensive |
By following these steps and choosing the right fastening method for your pool deck design, you can achieve a beautiful and durable deck that enhances your DIY home improvement project.
Step 4: Building Safe Stairs and Railings
As I continued with my pool deck construction project, I realized that building safe stairs and railings was a critical step. Safety around the pool area is not just a priority; it’s a necessity. Properly constructed stairs and railings not only enhance the overall aesthetic of your pool deck but also ensure that everyone using the deck can do so safely.
Constructing Sturdy Deck Stairs
When building deck stairs, it’s essential to start with a solid foundation. I began by determining the total rise and run of my stairs to ensure they were comfortable and safe to use. The total rise is the vertical distance from the deck surface to the ground, while the run is the horizontal distance that the stairs will cover.
I used stringers as the structural members that support the stairs. For a sturdy construction, I made sure to use pressure-treated lumber for the stringers and other components that would be in contact with the ground.

Installing Railing Posts and Hand Rails
Railing posts and handrails are critical components of a safe pool deck. I installed railing posts around the perimeter of my deck and at the stairs, ensuring they were securely fastened to the deck frame. The height of the railing posts should be in compliance with local building codes, typically between 36 and 42 inches above the deck surface.
For the handrails, I chose a material that was both durable and comfortable to grip. I made sure the handrails were securely attached to the railing posts and provided a continuous gripping surface along the stairs and around the deck.
Adding Balusters and Meeting Safety Codes
Balusters are the vertical elements that fill the space between the railing posts and handrails. They are crucial for preventing falls and ensuring the deck is safe for children and pets. I spaced my balusters according to local building codes, typically no more than 4 inches apart.
| Safety Feature | Description | Code Requirement |
|---|---|---|
| Railing Height | Height of railing posts above deck surface | 36-42 inches |
| Baluster Spacing | Distance between balusters | No more than 4 inches |
| Handrail Continuity | Continuous gripping surface along stairs and deck | Required for safety |
By following these guidelines and local building codes, I was able to build safe and compliant stairs and railings for my pool deck. This not only enhanced the safety of my pool area but also added to its overall appeal and value.
Finishing and Protecting Your Pool Deck
As I put the final touches on my DIY pool deck, I realized that the finishing stages are just as crucial as the construction process. This phase is where your deck transforms from a basic structure into a beautiful and functional outdoor space.
Sanding and Smoothing All Surfaces
The first step in finishing my pool deck was to sand and smooth all surfaces. This process removed any splinters, rough spots, or excess wood residue, creating a uniform texture that was both pleasant to touch and visually appealing.
- Start with coarse-grit sandpaper (about 80-100 grit) to remove any major imperfections.
- Progress to finer grits (120-150) for a smoother finish.
- Pay special attention to areas around railings and stairs where splinters can be a safety hazard.

Applying Weatherproof Stain or Sealant
After sanding, I applied a weatherproof stain or sealant to protect my deck from the elements. This not only enhanced the appearance of the wood but also extended its lifespan by shielding it from UV rays, moisture, and temperature fluctuations.
Tips for Application:
- Choose a product suitable for your deck’s wood type and local climate conditions.
- Apply the stain or sealant on a dry, calm day to ensure proper adhesion and drying.
- Follow the manufacturer’s instructions for application and drying times.
Adding Final Touches and Accessories
The final step was adding accessories that enhanced both the functionality and aesthetic appeal of my pool deck. This included installing outdoor lighting, adding planters or furniture, and incorporating decorative elements that reflected my personal style.
Some ideas for final touches include:
- Outdoor Lighting: Solar-powered lights or LED strips can add ambiance and safety.
- Decorative Railings: Adding decorative balusters or railings can enhance the visual appeal.
- Furniture and Accessories: Choose weather-resistant furniture and decor that complements your outdoor space.
By following these steps, I was able to create a beautiful and durable pool deck that not only met my needs but also became a centerpiece for outdoor entertainment and relaxation.
Common Mistakes to Avoid During Pool Deck Construction
As I reflect on my experience building a deck around my above-ground pool, I’ve identified key mistakes to avoid. Constructing a pool deck can be a rewarding project, but it requires careful planning and execution to ensure safety, durability, and aesthetic appeal.
One of the most critical mistakes is not checking local building codes and regulations before starting your project. This oversight can lead to costly rework or even project shutdown. To avoid this, research and comply with all local building codes, and obtain necessary permits.
Another common mistake is inadequate planning for drainage. Water accumulation around your pool can lead to structural issues and safety hazards. Ensure your deck design includes proper drainage solutions, such as sloping the deck away from the pool or installing a drainage system.
Incorrectly sizing the deck frame is another pitfall. A frame that is too small or too large for the pool can lead to structural instability or unnecessary expense. Carefully measure your pool and plan your deck’s dimensions accordingly.
Using inferior materials can compromise the safety and longevity of your pool deck. Choose high-quality, weather-resistant lumber and hardware to ensure your deck withstands the elements and heavy use.

Additionally, not ensuring the deck is level can lead to safety issues and affect the overall appearance of your deck. Use proper leveling techniques during construction to avoid this problem.
To further enhance your pool deck building experience, consider the following tips:
- Plan your deck design carefully, taking into account the shape and size of your pool.
- Use proper fastening methods to secure the deck frame to the pool wall.
- Regularly inspect your deck during construction to catch any potential issues early.
By being aware of these common mistakes and taking steps to avoid them, you can ensure a successful and stress-free pool deck construction project.
Maintaining Your Above-Ground Pool Deck for Longevity
Regular upkeep of your above-ground pool deck is essential for safety, durability, and overall enjoyment. A well-maintained deck not only enhances the aesthetic appeal of your outdoor space but also ensures a safe environment for family and friends.
To keep your pool deck in top condition, it’s crucial to establish a routine maintenance schedule. This includes regular cleaning, inspections, and necessary repairs or refinishing.
Weekly and Monthly Cleaning Tasks
Cleaning your pool deck regularly is vital to remove dirt, debris, and algae that can cause slips and falls. Weekly cleaning tasks should include sweeping the deck to remove leaves and other debris. For monthly cleaning, use a mild detergent and water to scrub the deck, paying special attention to areas around the pool where dirt and algae tend to accumulate.
For tougher stains or dirt buildup, consider using a deck cleaner specifically designed for your deck’s material. Always follow the manufacturer’s instructions to avoid damaging the deck surface.
Annual Inspection and Maintenance Schedule
An annual inspection is critical to identify any potential issues before they become major problems. Check for signs of wear and tear, such as loose boards, rotting wood, or rusty fasteners. Make a list of necessary repairs and address them promptly to prevent further damage.
- Inspect the deck’s structural integrity, including support posts and railings.
- Check for any signs of water damage or rot.
- Tighten any loose screws or nails.
- Apply a fresh coat of sealant or stain if necessary.
When to Reseal or Refinish Your Deck
The frequency of resealing or refinishing your deck depends on the type of material and the level of exposure to the elements. Generally, a deck should be resealed every 2-3 years. However, this can vary based on factors such as weather conditions and the quality of the previous sealant.
Signs that it’s time to reseal or refinish your deck include:
- Fading or discoloration of the wood.
- Water no longer beads on the surface.
- Visible wear and tear on the wood surface.
By following these maintenance tips, you can extend the life of your above-ground pool deck and ensure it remains a safe and enjoyable part of your outdoor living space.
Conclusion
As I reflect on the step-by-step process of building a pool deck around an above-ground pool, I’m reminded of the joy and satisfaction that comes with completing a DIY project. By following this guide, you’ve gained the knowledge and confidence to build a pool deck that not only enhances your outdoor living space but also increases your home’s value.
From planning and preparing the site to constructing the support frame and installing decking boards, each step has brought you closer to creating a beautiful and functional pool deck. The step-by-step pool deck guide has walked you through the essential tools and materials needed, common mistakes to avoid, and maintenance tips to ensure your deck remains safe and durable.
Now, it’s time to put your new skills to the test and start building your dream pool deck. With a clear understanding of the process, you can tackle this project with confidence. So, gather your tools, follow the steps, and enjoy the process of creating a stunning pool deck that will be the centerpiece of your outdoor entertainment for years to come.